
AI Traffic Counting Software
User Guide
Get Started in Minutes with the AI Traffic Counting Software
Learn how to install, activate, and use Arterials AI Traffic Counting Software — a powerful, engineer-built tool that automatically counts and classifies vehicles from video footage.
This quick setup and operation guide will help you get up and running in minutes, whether you’re analyzing intersection turning movements, roundabout traffic, or corridor flows.
Follow the steps below to install the software, load your first video, configure counting parameters, and export professional Excel reports.
Arterials AI Traffic Counter automates traffic data collection using artificial intelligence. Follow the steps below to install, activate, and use the software effectively.
📚 Table of Contents
- System Requirements
- Installation– How to Install the AI Traffic Counting Software
- License Activation – Entering and Managing Your License Key
- Loading a Video – Importing Traffic Footage for Analysis
- Setting Up Counting Parameters
- Outputs
- Drawing Approach and Movement Lines
- Processing and Progress Window
- Viewing Results
- Best Practices for Video Recording
- Troubleshooting
- Contact Support
⚙️ 1. System Requirements
| Component | Recommended Specification |
|---|---|
| Operating System | Windows 10 or Windows 11 (64-bit) (Mac and Linux not supported yet) |
| Processor | Intel i5 or higher |
| Memory (RAM) | 8 GB minimum (16 GB recommended) |
| Graphics Card (GPU) | Recommended System for Best Performance GPU (highly recommended): NVIDIA graphics card improves processing speed significantly. Works best with RTX 30-series and newer. Older GPUs may still work, but performance could be slower. CPU only: The software will still run without a GPU, but processing will be slower. Tip: If your GPU is not listed or is older than RTX 20-series, the program will automatically use your CPU See list of AI Computing Compatible GPUs. |
| Storage | 5 GB free space for Installation. Several GBs needed for output video files depending on their length and quality. |
| Input Format | MP4, MOV, AVI |
| Output Format | mp4, Excel (.xlsx) |
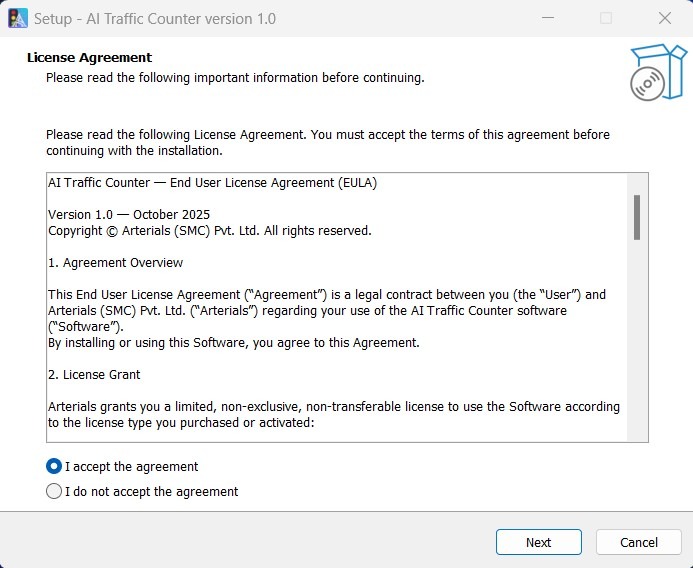
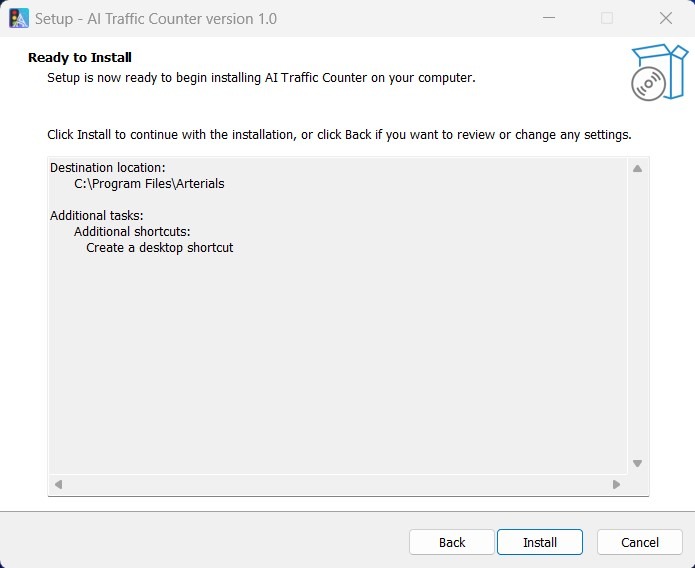
💾 2. Installation
- Download the installer from the Download Page.
- Double-click the
.exefile and follow on-screen instructions. Windows Defender may temporarily flag this file. This is a false positive. Ensure the file is downloaded from arterials.co - Choose your preferred installation directory.
- Once installed, launch Arterials AI Traffic Counter from your desktop or Start Menu.
🔑 3. License Activation
- Make sure you have internet connection.
- Open the software.
- If running in trial mode, the license activator would open on startup.
- Enter the license key you received via email after purchase.
- Click Activate — your software will unlock full access. The Software will remain active as long as your license is valid.
🔄 To renew your license, visit the Renew License page.
If you’re using the Free Trial, you can process videos up to 20 minutes in length before upgrading to a paid license.
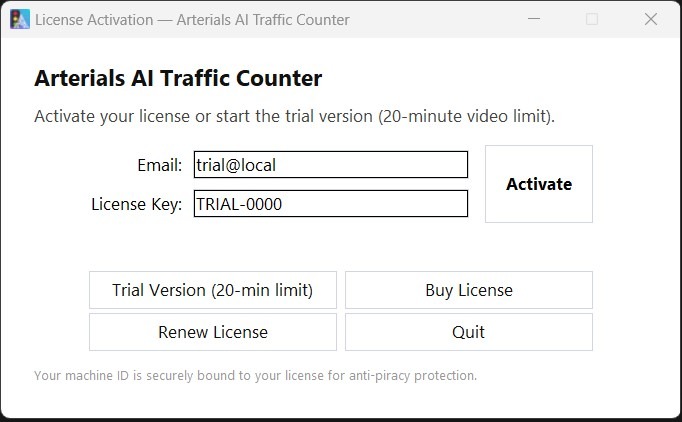
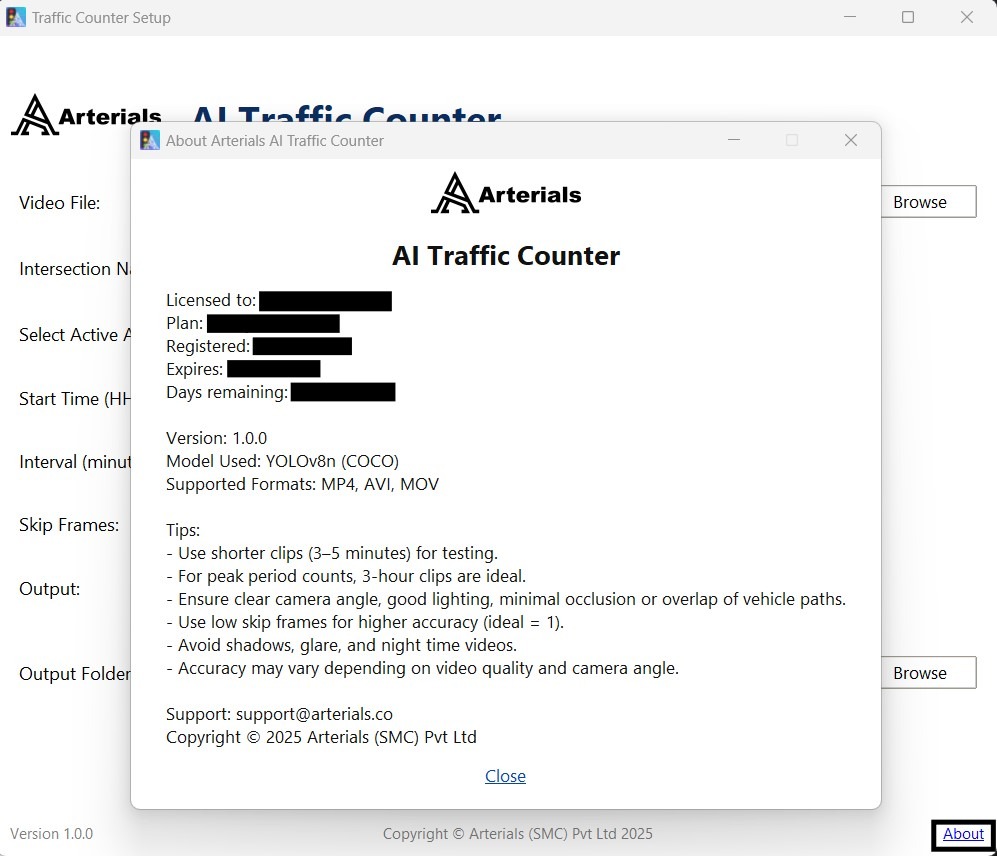
You can view your license status in the About Window.
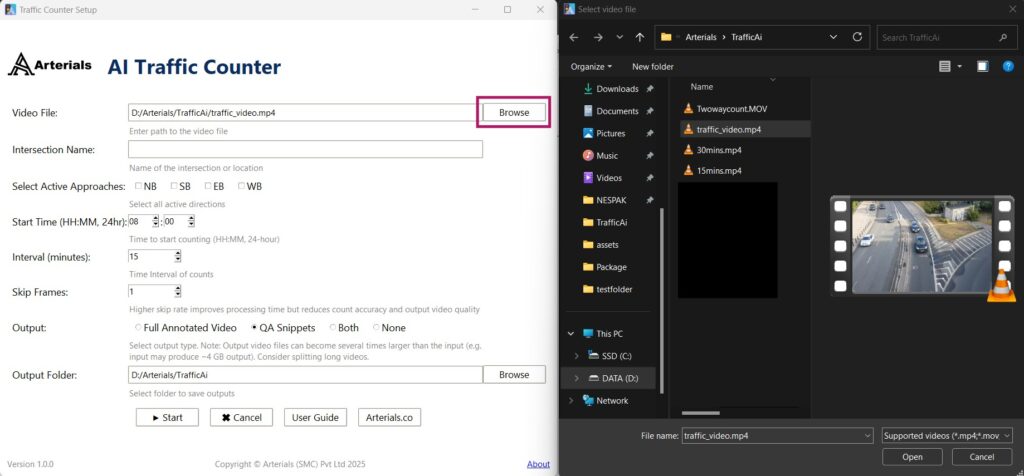
🎥 4. Loading a Video
- Select your traffic video file (
.mp4,.mov, or.avi) using the browse button or entering its file path.- It is good to know the start time of the video e.g. (7:00 am, 6:15pm). You will need to enter this later.
- While the software can process long videos (12hrs+), it would save alot of processing time running a 3 hour long video of a known peak period.
- The video will load in the main workspace.
- Confirm that the playback window opens correctly and displays all visible approaches.
For optimal results, ensure your video shows a clear elevated view of the intersection.
🧭 5. Setting Up the Counting Parameters
5.1 Intersection Name
This label will be applied to your output annotated videos excel files. and Keep something memorable like Lexington Ave / 5th Ave, or Broadway (2-way)
5.2 Select Active Approaches
The software supports up to four approaches which will be labelled as Northbound (NB), Southbound (SB), Eastbound (EB), Westbound (WB). For 4 approach intersections, you can set all approaches to be active. If you are interested only in one approach, you can select one approach. For two way counts, you can select two approaches. Ensure that you know what you are counting before selecting approaches as you will be required to draw their lines on a video snapshot.
5.3 Start Time:
Type in or use the spinner to define the start time of your video in 24 hour format e.g. 07:00, 16:00. This establishes the start time of the count and should coincide with the start time of the video recording.
5.4 Interval (Minutes) ⏱️
The Interval parameter defines the time period (in minutes) used to group traffic counts in your output report.
For example, if you set an interval of 15 minutes, the software will summarize all detected movements and classifications within each 15-minute block of the video.
This setting directly affects how your Excel report and charts are structured.
Common Use
- 15-minute intervals are standard in most traffic engineering practices, used to calculate peak hour factor (PHF).
- You may use shorter intervals (e.g., 5 minutes) for detailed variation tracking or longer intervals (e.g., 30 or 60 minutes) for extended survey periods.
Example
| Interval Setting | Typical Use Case |
|---|---|
| 5 minutes | Fine-grained analysis for short-duration studies |
| 15 minutes | Standard peak hour counts |
| 30–60 minutes | Long-duration or off-peak monitoring |
⚠️ Tip
Be careful when entering an interval longer than the video duration.
If your interval exceeds the video length (for example, a 20-minute interval for a 10-minute video), all counts will be grouped into a single interval in the output report.
5.5 Skip Frames:
The Skip Frame parameter controls how frequently the AI processes frames from your input video. Instead of analyzing every single frame, the software can “skip” frames to reduce total processing time — ideal for long or high-frame-rate videos.
If Skip Frame = 1, the AI processes every frame (most accurate).
If Skip Frame = 2, it processes every second frame (about 50% faster).
If Skip Frame = 3, it processes every third frame, and so on.
Trade-Off: Speed vs. Accuracy
- ✅ Lower Skip Frame values (1–2) → Higher accuracy, smoother detection.
- ⚙️ Higher values (3–5+) → Faster processing, but risk of missing fast-moving or overlapping vehicles.
Detection may appear “choppy” or inconsistent when too many frames are skipped.
Recommended Settings
- Skip Frame = 1 → Use for most videos (standard 25–30 fps).
- Skip Frame = 2–3 → Only for ultra-HD videos with very high frame rates (e.g., 120–144 fps) to save time without major accuracy loss.
- Skip Frame > 3 → Not recommended unless for experimental use or previewing.
Annotated Video Output
Your output annotated video (with bounding boxes) will be generated using the same Skip Frame setting.
This allows you to visually review how well the AI performed under the chosen frame rate — a useful tool for validation and fine-tuning.
Pro Tip: Before processing a full multi-hour recording: 🎬 Test a short 1–2 minute snippet of your video with different Skip Frame settings.
Compare accuracy and speed, then apply the best balance to your full dataset.
🎞️ 6. Outputs
6.1 Anotated Videos
The Output parameter lets you choose whether the software produces annotated videos during processing. Annotated videos show bounding boxes, movement arrows, and classifications; a way to visually verify AI performance.
You can select one of the following options:
| Option | Description |
|---|---|
| Full Annotated video | Generates an annotated video of the entire input length and saves it in the output folder. Ideal for detailed QA or presentation purposes. |
| QA Snippets | Produces a short annotated video (~1.5 minutes) consisting of: 30 seconds from the beginning, 30 seconds from the middle, and 30 seconds from the end. This is recommended for most use cases, as it provides a quick quality check without creating large files. |
| Both | Generates both a Full Annotated Video and QA Snippets. Useful when you want a complete record but also a quick review. |
| None | No annotated video is produced. Only the structured counts and Excel reports are generated. Use this option to save storage and speed up processing. |
Pro Tips
- Annotated videos are very large — approximately 3× the size of the input video.
⚠️ Make sure your destination drive has enough free space before selecting Full or Both.- The software creates temporary files during processing named:
[IntersectionName]_[Timestamp]_temp_These include both Full and QA videos and are stored in the output folder. Do not delete them, they are temporary.- QA Snippets are sufficient for most quality checks and save time and storage compared to producing the full annotated video.
Usage Tip
For typical traffic studies:
- Process one full video per intersection initially to confirm that your detection and classification setup is accurate.
- For all subsequent videos, use QA Snippets — this provides a quick quality check while saving time and storage, since generating the full annotated video every time is rarely necessary.
6.2 Output Folder
Browse to the folder you want to export your results to. The annotated videos, excel exports, and temp files will be stored here. The folder of the input traffic video is selected by default.
🖊️7. Drawing Approach and Movement Lines
Once all input parameters are entered and you click Start, the software will open a still image from your loaded video. This is the line-drawing interface, where you define the Approach Lines and Movement Lines that form the foundation of your traffic counting setup.
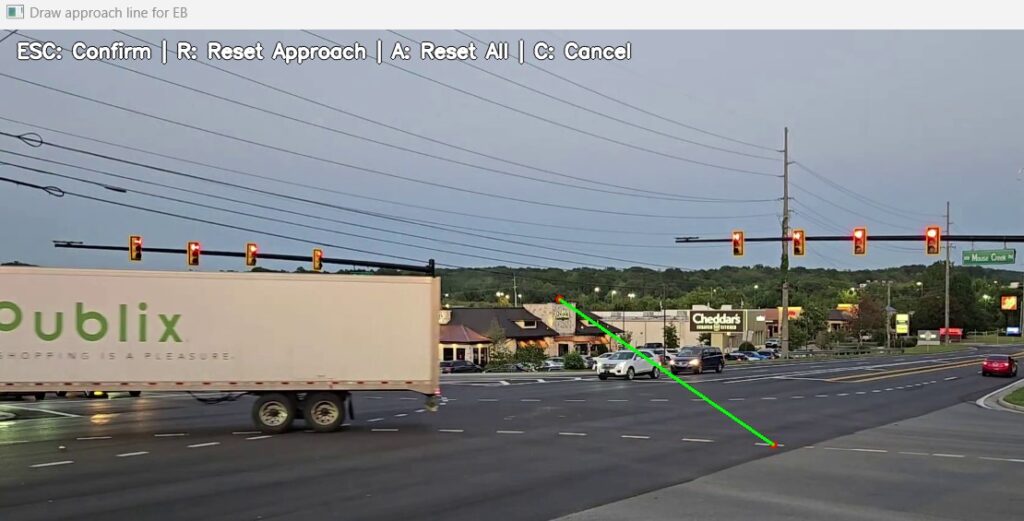
7.1 Approach Lines
An Approach Line represents a reference point for vehicles coming from a specific direction (e.g., Northbound, Southbound, etc.).
When the window title says “Draw NB Approach Line”, you should:
- Draw a line across the screen where all Northbound vehicles will cross before entering the intersection.
- This line acts as a trigger zone — any vehicle that passes this line will be evaluated for a matching movement.
You’ll repeat this step for each approach (e.g., NB, SB, EB, WB).
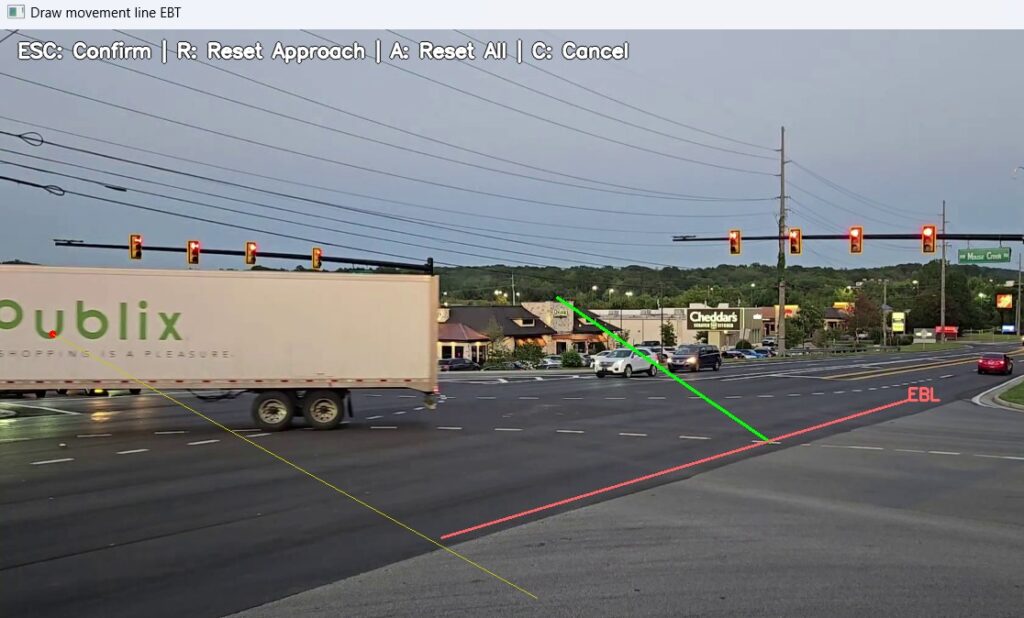
7.2 Movement Lines
After defining an approach, the software will prompt you to draw Movement Lines for that approach — for example, “Draw NBL Line”, “Draw NBT Line”, and “Draw NBR Line.”
- Each Movement Line corresponds to a specific turning movement (Left, Through, Right, U-Turn).
- A vehicle is counted only when it crosses both:
- The Approach Line, and
- One of its Movement Lines.
Example:
If a vehicle crosses the NB Approach Line and then the NBL Line, it will be recorded as a Northbound Left (NBL) count.
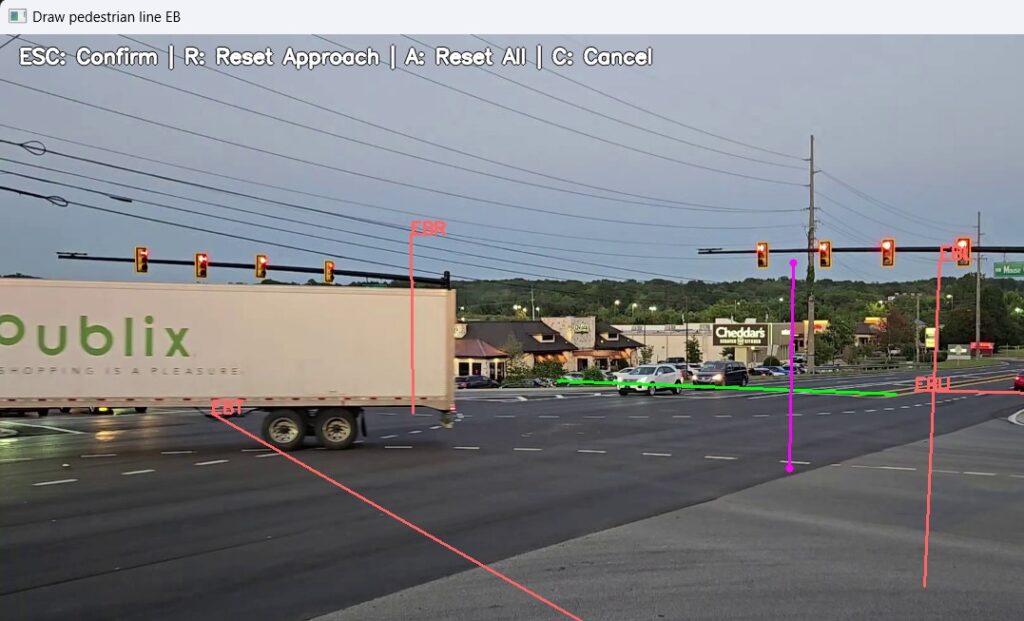
7.3 Pedestrian Lines
You’ll also be prompted to draw Pedestrian Lines for each crosswalk or crossing movement you wish to record. These are treated separately from vehicular movements.
7.4 Controls and Shortcuts🧩
| Key | Action |
|---|---|
| Esc | Confirm the currently drawn line and move to the next prompt. |
| R | Reset the current Approach — clears all its movement lines and restarts that approach. |
| A | Reset All Lines — clears everything and starts over from the first approach. |
| C | Cancel the process and return to the main input window. |
Note:
If you make a mistake while drawing a line, simply draw the new one — the old line disappears automatically.
Lines are not finalized until you press Esc to confirm.
💡 Tips for Accurate Line Drawing
Preview First:
Use short videos and QA Snippets (from the Output options) to verify that your drawn lines are working as intended before running long-duration analyses.Unused Movements:
For movements that don’t exist (e.g., missing turns in a T-intersection), draw the redundant movement lines in an area where no vehicles pass. Keep these dummy lines very short to maintain a clean workspace.Line Angles & Vehicle Paths:
Think about the camera angle and how vehicles move through the frame.
Draw lines at an angle that ensures the entire vehicle crosses the line, not just part of it.
Properly angled lines improve detection reliability and prevent missed counts.
🧮8. Processing and Progress Window
After all Approach, Movement, and Pedestrian Lines have been drawn, the AI engine begins analyzing your video.
During this stage, the software detects moving objects, classifies them by vehicle type, and logs their movements based on the lines you defined.
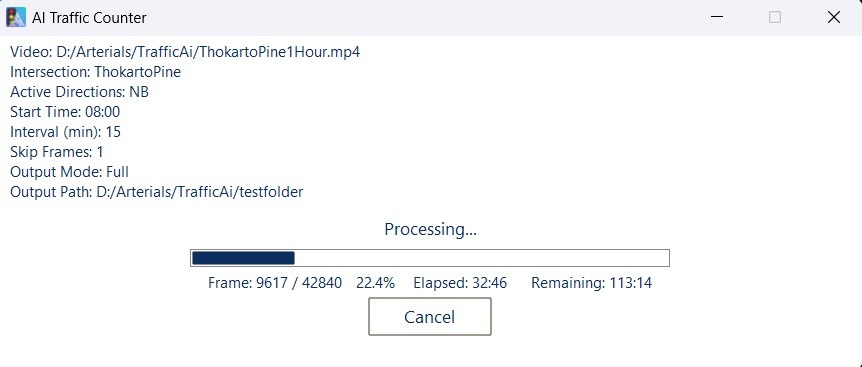
8.1 Progress Window Overview
Once processing begins, you’ll see a Progress Window summarizing key information about the current task:
| Field | Description |
|---|---|
| Project Summary | Lists the intersection name, video file, and key input settings. |
| Total Frames | The total number of frames in the input video. |
| Frames Processed | The number of frames analyzed so far. |
| Frames Remaining | Estimated frames left to complete. |
| Time Elapsed | Total time since processing started. |
| Time Remaining | Estimated remaining time based on current speed. |
You can monitor progress in real time as the AI engine works through the video.
8.2 Canceling a Running Process
If you click Cancel during processing, the software will automatically save partial results, including:
- Partial Full and/or QA Annotated Videos, depending on your selected output option.
- Partial Excel count tables and summary sheets, reflecting progress up to that point.
⚠️ Warning:
Clicking Cancel too early (for example, after only a few seconds of processing) can result in corrupted outputs or mismatched data — such as incorrect skip-frame handling, invalid interval lengths, or incomplete Excel files.
Always let the software process for at least a few minutes to stabilize before canceling if necessary.
8.3 Processing Speed and Hardware Recommendations
Processing time depends on several factors:
- Video Length and Resolution
- Frame Rate
- Skip Frame Value
- Available Hardware Resources
Arterials AI Traffic Counter performs best on systems with Intel processors and dedicated NVIDIA GPUs that support CUDA acceleration.
💡 Recommended Setup:
- CPU: Intel i5 or higher
- GPU: NVIDIA GPU with CUDA support
- RAM: 16 GB or more
A capable GPU can significantly reduce processing time by offloading AI detection tasks from the CPU.
AMD GPUs are not currently supported for acceleration and will default to CPU-based processing, resulting in slower performance.
📊 9. Viewing Results
Once processing completes, Arterials AI Traffic Counter automatically generates both annotated videos and Excel reports in your specified output folder. These outputs help you visually verify detection quality and review the final traffic counts in structured form.
9.1 Annotated Video Outputs🎞️
If you selected Full, QA Snippets, or Both in the Output settings, annotated videos are produced showing:
- Detected Vehicles: Each object is outlined and labeled by its class (e.g., Car, Truck, Bus, Pedestrian).
- Drawn Lines: The approach and movement lines you created earlier are displayed clearly on the video.
- Count Overlays:
- Interval Counts: Show the total number of vehicles detected in the current interval.
- Cumulative Counts: Show total counts since the beginning of the video.
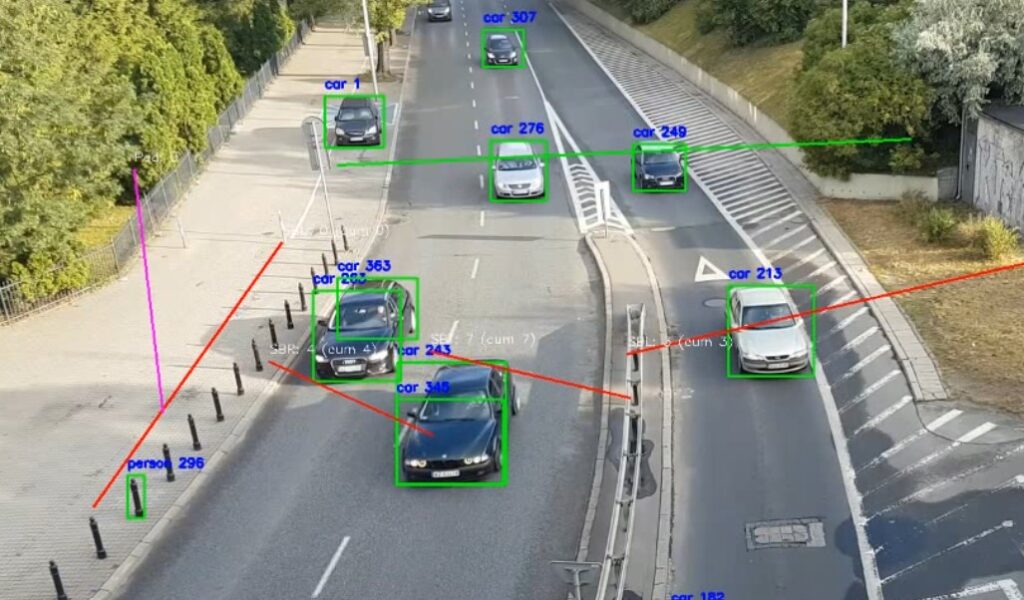
These overlays allow you to see exactly how the AI is identifying and classifying vehicles across time.
💡 Good Practice:
Always perform a manual spot-check using the annotated video to confirm that counts are accurate and detection is stable.
Look for consistent bounding boxes, proper classification, and smooth tracking across frames.
Poor video resolution, strong shadows, or extreme angles may reduce detection accuracy. Consider adjusting Skip Frame or line placement if results appear inconsistent.
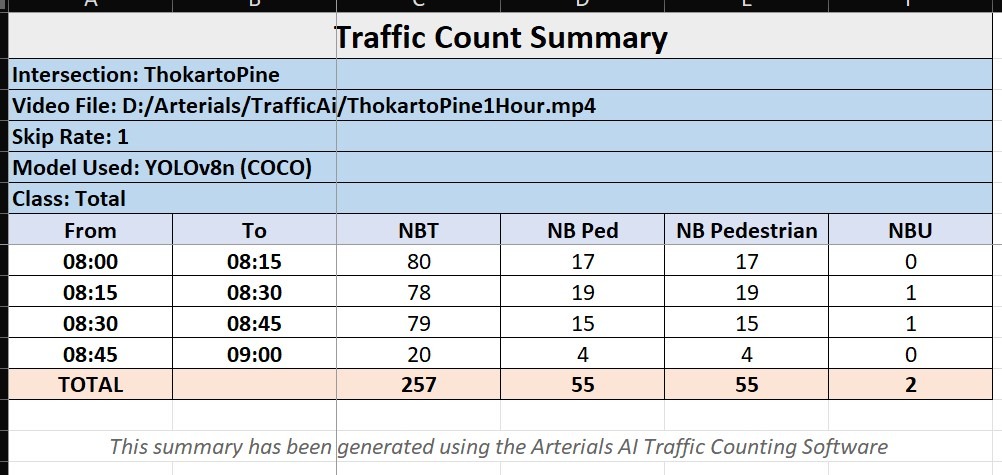
9.2 Excel Output Files📊
The software generates an excel files for every full and partially processed video:
The excel file:
- Consistent Traffic-engineering-friendly format.
- Contains the interval-by-interval record of all detections.
- Each movement (e.g., NBL, NBT, NBR, etc.) is logged with corresponding timestamps and vehicle classifications.
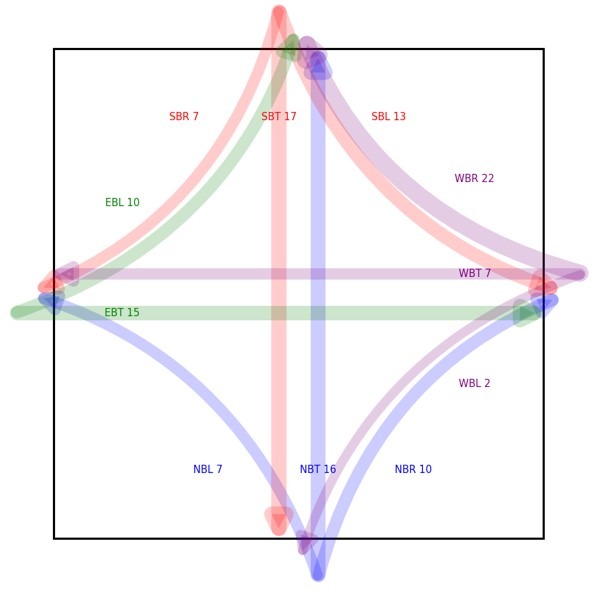
- A visual diagram summarizing the whole traffic count for the recorded period. Heavier Movements will have thicker arrows.
- This sheet is useful for immediate clarity on the traffic situation, detailed validation or custom data analysis.
- Each vehicle class (Car, Truck, Bus, etc.) gets its own sheet.
- Columns represent turning movements (e.g., NBL, NBT, NBR, EBL, EBT, EBR, etc.).
- Rows represent time intervals (as defined in your input settings).
- A Totals Sheet combines overall counts across all classes for a full intersection summary.
✅ Verification Tip
Before relying on your counts for analysis, check that:
- The interval totals in Excel match what you see in the annotated video overlays.
- The movement directions and classifications are consistent with your defined approach setup.
Performing this quick manual review ensures your data is fully validated before exporting it for modeling or reporting.
🎬 10. Best Practices for Video Recording
To achieve accurate detection and classification:
- Use tripod-mounted or drone footage with minimal vibration.
- Maintain a clear overhead or elevated angle.
- Avoid nighttime glare or strong shadows.
- Recommended duration: 3-6 hours per video.
- Acceptable resolution: 1080p (Full HD) at 25–30 fps.
🧰 11. Troubleshooting
| Issue | Possible Cause | Solution |
|---|---|---|
| Video won’t load | Unsupported video codec or corrupted file | Convert video to MP4 (H.264) using free tools like HandBrake or VLC Media Player. Ensure file name has no special characters. |
| Counts appear too low | Camera angle too shallow, occlusion (vehicles hiding behind others), poor resolution, or high Skip Frame setting | Adjust camera position for better visibility, redraw lines to cover vehicle paths fully, or lower Skip Frame value (1–2). Use HD video. |
| License not activating | Invalid, expired, or mistyped license key | Double-check license spelling. If still not working, contact support with your purchase email and license key. |
| Slow processing | Low CPU/GPU performance or very high-resolution video | Close other programs, lower input video resolution, or reduce Skip Frame value. Use NVIDIA GPU with CUDA for best performance. |
| Output videos missing | “None” selected in Output Type, or insufficient disk space | Confirm Output Type is set to “QA Snippets” or “Full.” Ensure enough free disk space on output drive. |
| Excel outputs missing/corrupted | Video processing interrupted too early or software closed during run | Reprocess the video or allow full completion. Avoid pressing Cancel within the first few seconds of processing. |
| Counts seem inconsistent | Incorrect line placement or short interval length | Verify approach and movement lines are placed correctly and cover all lanes. Use 15-minute intervals for standard traffic analysis. |
| Vehicles not detected properly | Poor lighting, glare, or night footage | Use daytime footage with good contrast. Avoid videos with heavy shadows or rain reflections. |
💡 Pro Tip: Before running a long video, always test a short Snippet (1–2 minutes) to verify detection quality and output accuracy.
💬 12. Contact Support
Need help? Our technical team is ready to assist.
📧 support@arterials.co
📄 Include your license key, software version, and a brief issue description for faster resolution.